Monday, 27 August 2012

Trend Alert: Velvet

So, it looks like velvets gonna be big in the Autumn! Which is awesome seeing as I live in cold, rainy England (I'm assuming velvet keeps you warm...?) But, honestly, I love velvet, I already have two velvet skirts in my wardrobe that I made when I was like 12 aha. No doubt I'll probably have to redo those... I also have like three metres of plum velvet stuffed away somewhere! So there'll definitely be a few velvet-based DIY's up! Here's a few pieces that I really like..

Dolce & Gabbana
Burberry Prorsum
Balmain
I especially love this skirt. DIY must.

Versus F/W 12
Miss Selfridge F/W Collection

Thursday, 23 August 2012

DIY Spike and Skull Necklace

If you know me, you know I love anything with skulls or spikes. Or metal and chains. (sounds like I'm into some kind of kinky bondage..)
So its completely predictable of me to do this DIY but ahh wellllll...

You will need: 
  • Flat head pins
  • Screw-in spikes(minus the screws)
  • A glue gun
  • Round nose pliers
  • Normal pliers (not shown)
  • Skull and cross beads or charms
  • Jump rings and a necklace or chain, if you're using a chain you also need a clasp.
Most of these things you can get from craft stores or Ebay. I got all my beads and chains etc. from The Bead Shop in Manchester. And I got the spikes from Studs&Spikes.com but you can find them on Ebay and Etsy.

 Get one of your spikes, a flat head pin and your glue gun ready.
 Point the nozzle of your glue gun into the hole in the spike where the screw is meant to go. Careful not to burn your fingers on the hot glue like I did!
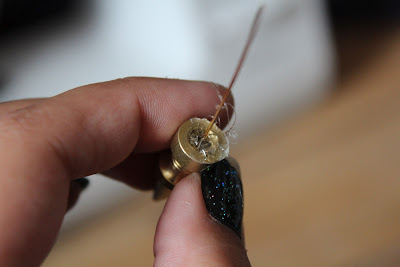
 Whilst the glue is still wet, keep in mind it dries quickly, push the flat end of the pin right into the bottom of the spike.
 Repeat until you've done it with all the spikes, I did 6 but only ended up using 4 so I made matching earrings with the other two! You can pick off the excess dried glue with your nails or a small pair of scissors, its pretty easy to pick off though.
 Use the wire cutters on your pliers to cut down the end of the pin to about 1 1/2 centimetres. You can use an old pair of scissors if you don't have wire cutters, its pretty easy to cut through.
 Clasp the end of the pin inbetween the middle of your round nose pliers and slowly roll it so that you get a loop.
 Repeat with the others.
 Line up your beads in the order you want. Whilst I was doing mine, I decided to leave it when I got to the 2nd spike (going from the centre outwards) just because I thought it would look too much with the rest on aswell, but its completely up to you how many you have and where you have them. So go crazy with it!
 You also need to place the beads on flat head pins and make a loop in the top. Exactly the same as the spikes except you just need to put the flat head pin through the hole in the bead, no need for gluing.
 Open your jump rings with your pliers.
 Find the middle of your chain put one end of the jump ring through the chain.
Then put it through the loop on top of your bead or spike. I spaced mine apart by 4 chain links.
 Repeat this for all your beads and spikes. If you need to, attach the clasp at the end the same as you would with the beads, just using a jump ring, and remember to put a jump ring on the other side to connect it. And voila! You have your DIY Spike and Skull Necklace! This is the matching earring I made using the extra spike. Due to having one stretched ear though, it only seemed logical to make one earring aha
Happy DIY-ing!

Wednesday, 22 August 2012

Zara's New Collection

Just walking past the Zara store yesterday, and I happened to glance at the outfits in the window as I hurried past. I try to avoid looking in any shops when I'm poor (which seems to be all the time) but I just couldn't resist. The studs. The leather. The beading. It was love at first sight! aha definitely a few DIY-able pieces in here though! I think I actually need the shoes though. They're amazing. I was tempted to do a separate blog post just for them. I probably should have actually aha.


 This beaded blouse and skirt combo is just beautiful. Definitely DIY-ing the skirt.
 I'm pretty sure I saw this exact same skirt in H&M but this one is a little more 'school-girl' like.. Still. I absolutely love it.


I LOVE ALL THESE SHOESSSSS!!! I really need to figure out a way to DIY the whole metal shoe cap thing but inspiration hasn't quite struck yet :( please feel free to let me know if you have any ideas!

Thursday, 9 August 2012

DIY Spiked Camo Jacket

So you may have seen that I posted a few days ago about Camouflage Jackets, and after that I did a bit of looking around, trying to find a nice Camouflage Jacket for myself.
One was from Topshop and was 58 pounds.. and the other was from Urban Outfitters and was 48 pounds...

Now, I don't know about you, but I thought that was quite expensive... so, of course, my first thought was to DIY my own with spikes on it! I found a camo jacket at Afflecks in Manchester from the shop Soho's. There is also an army surplus store like next door too, but the one from Soho's fit me a little better. And I'm also pretty sure that its exactly the same as the one from Urban Outfitters.. (pre-spikes ofc)..

So here's what you need to spike up your own camo jacket
-A camo jacket (kind of a must)
-Some studs or spikes of your choice
-And a pair of pliers


Here is the jacket that I bought for a measly 15 pounds!
Next pick where you want to place your spikes. I chose the top of the sleeve and the shoulder area. You can mark where you want them with a piece of chalk if you like but I just kinda eyeballed it, starting from the centre. Push the prongs of you spikes through the fabric, it should go through quite easily, you may just have to push it firmly to make sure they are properly through.

Push the prongs flat with your pliers, you can use your fingers if you want as usually the metal is quite soft and malleable, but it usually hurts my fingers after doing quite a few! aha
You can put as many spikes in as you like, in whatever pattern you like. I went for a standard semi-circle from the shoulder seam.
I wore it with my vintage black Levi shorts and a floral basque from Forever 21.


Happy DIYing! :)